
Replanting Rose Bushes
Transplanting roses is a common practice in many homes. When is the best time to transplant roses? We occasionally want to relocate a rose plant that has already established itself. It might be that it’s in the wrong place, that you’re moving, or that you’d like to pot it up and gift it to a friend.
For young plants, this is a simple task. However, it gets complicated if the plant is old and established.
When is the Best Time to Transplant Roses?
When is the ideal time for replanting rose bushes? Will they die if I relocate them while they’re in full bloom? Early spring is the best time of year to transplant roses for most of the United States. The Soil is soft and easy to work, and the rosebush is nearly dormant. The upcoming warm weather will aid in the bush’s regeneration.
If the soil is still warm, the second-best period is in the fall, around the end of October or early November. The more time the plant has to restore itself before the winter cold sets in, the better. It is possible to transplant roses in the middle of the season, such as June or July, but it is risky. Pruning the shrubs back by one-third is a safe bet which would remove your flowers.
This helps the roses recover from any transplant shock. To transplant, prepare the new place as if you were planting the bush for the first time, but add more water, soil, or mulch to keep the bush from drying out. Carefully avoid losing any roots. Move as soon as possible, and hill the soil or mulch to retain as much moisture as possible.
When rain is expected, transplant on a moderate, calm, cloudy day to avoid dehydration. If possible, avoid exposing the plant’s delicate, white feeder roots to air, sun, or wind.
Transplanting of Dormant Plants
When you’ve finished pruning and cleaning up the space around the plant for the winter, cut a 17.7-inch (45-centimeter) diameter circle using a long thin spade (the larger, the better). However, you won’t need to cut straight under the plant, angle the spade slightly toward it to make the work of pulling it out much easier.
Reach down and pluck the rose from the plant’s base, shaking it to loosen the soil from the roots.
Fill a pail with simple water and place the rose roots in it. To keep the plant from drying out, move it about in this bucket. It is critical to maintain the roots’ moisture until they are planted in their new place. Never allow the roots to become dry. It’s a good idea to match the plant’s top growth to the number of roots you’ve left on.
The plant doesn’t have to work too hard to provide a large branch structure from a limited root system. After that, you can plant the rose as a bare root rose in the new place.
During the growing season, you can transplant your plants. This is a little more difficult because the plant’s roots require soil around them. During this time, any air that gets to the roots can harm the plant. Prune to half its original size; the balance of roots to growth will be necessary to ensure that the plant is not overly shocked, but you do not need to prune in the winter.
Once in its new location, your plant may wilt a little or sit for a few weeks, but if maintained moist, it will recover. Please leave at least three to four long juvenile canes attached to climbers and weepers, though you can clip the lateral branches.
Cut a 17.7-inch (45-centimeter) diameter circle around the plant using a long thin spade; the larger, the better. You won’t need to cut straight under the plant. Instead, angle the spade slightly toward it to make the work of pulling it out much easier. Keep as much dirt around the roots as possible while pulling the plant from the ground; the more, the better.
Place the plant, together with the soil it came with, in a container for relocation to its new home.
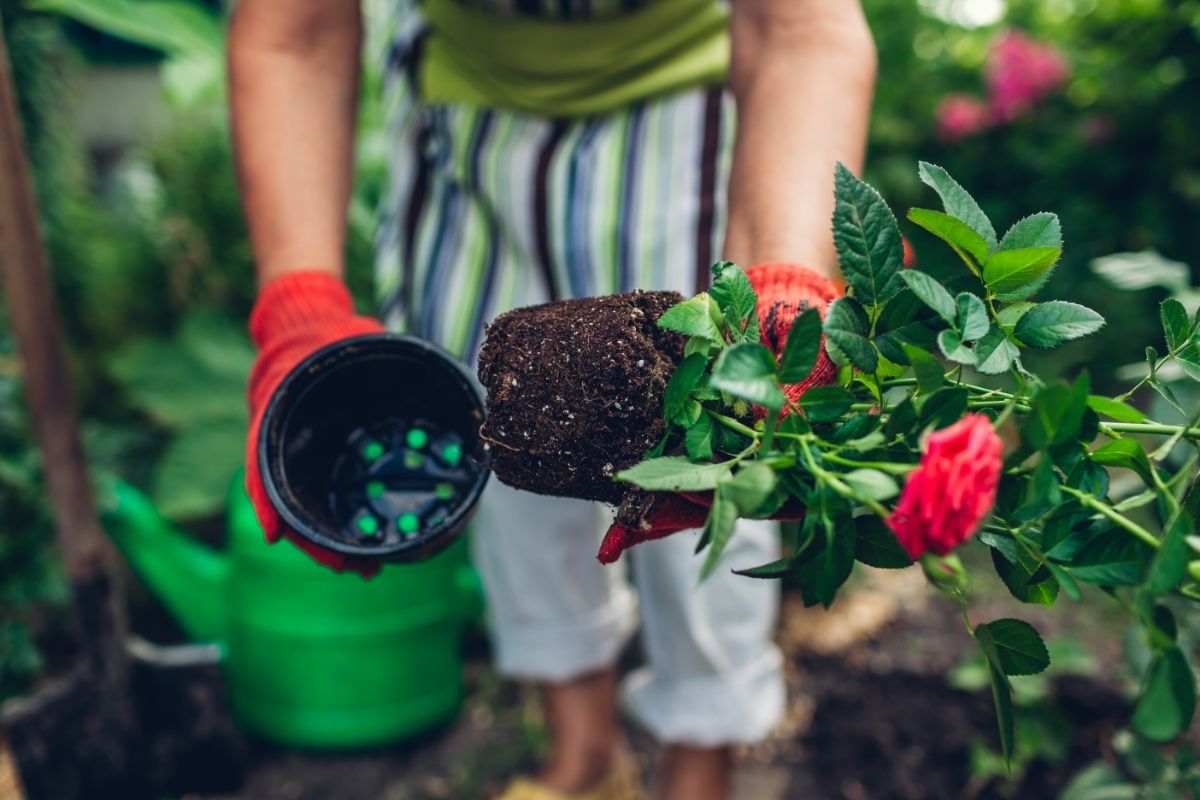
Simply dig a hole slightly larger than the plant’s root ball and place the rose into it before replanting. Ascertain that the rose is planted at the same height as the original. Backfill the hole with water and let it sit for a while.
Tips for Replanting Roses
When can you transplant roses? This is a popular question. If your lovely roses grow in an uncomfortable or inconvenient position, seek expert guidance. Alternatively, you can use the following step-by-step instructions to transplant rose bushes effectively:
The First Step
Water the rose bush thoroughly for a few days. Transplanting rose bushes necessitates some preparation. To do so, hydrate them every day for the week leading up to your scheduled transplant. Then, make sure to soak your roses thoroughly, keeping the soil moist at all times.
Step 2: Plan Ahead for Your Garden Bed
You’ll need to prepare the new planting site before moving roses. Roses flourish in fertile, organically rich soil, adding plenty of compost to the garden bed.
Step 3: Pruning the Rose Canes
You must prune roses to have the highest chance of a successful transplant. Cut the rose canes back to approximately 12 inches (5 centimeters) in length with a pair of garden shears or trimmers.
Step 4: Prepare the Garden Bed by Digging a Hole
The next step is to dig a hole at the new planting location for the roses. As a general guideline, dig a hole roughly the same size as the spread of the rose canes. Put peat moss, potting soil, or other organic materials in the hole to provide your bush with plenty of essential nutrients after it’s been transplanted.
Step 5: Remove the Rose Bush Carefully
Gently dig a circle about 9 inches (3.5 centimeters) out from the drip line of your rose shrub with a shovel. Continue digging until the shovel can easily pass through the root ball. Then, carefully lift it out, removing as much soil as possible along with the roots.
Step 6: Plant the Rose Bush
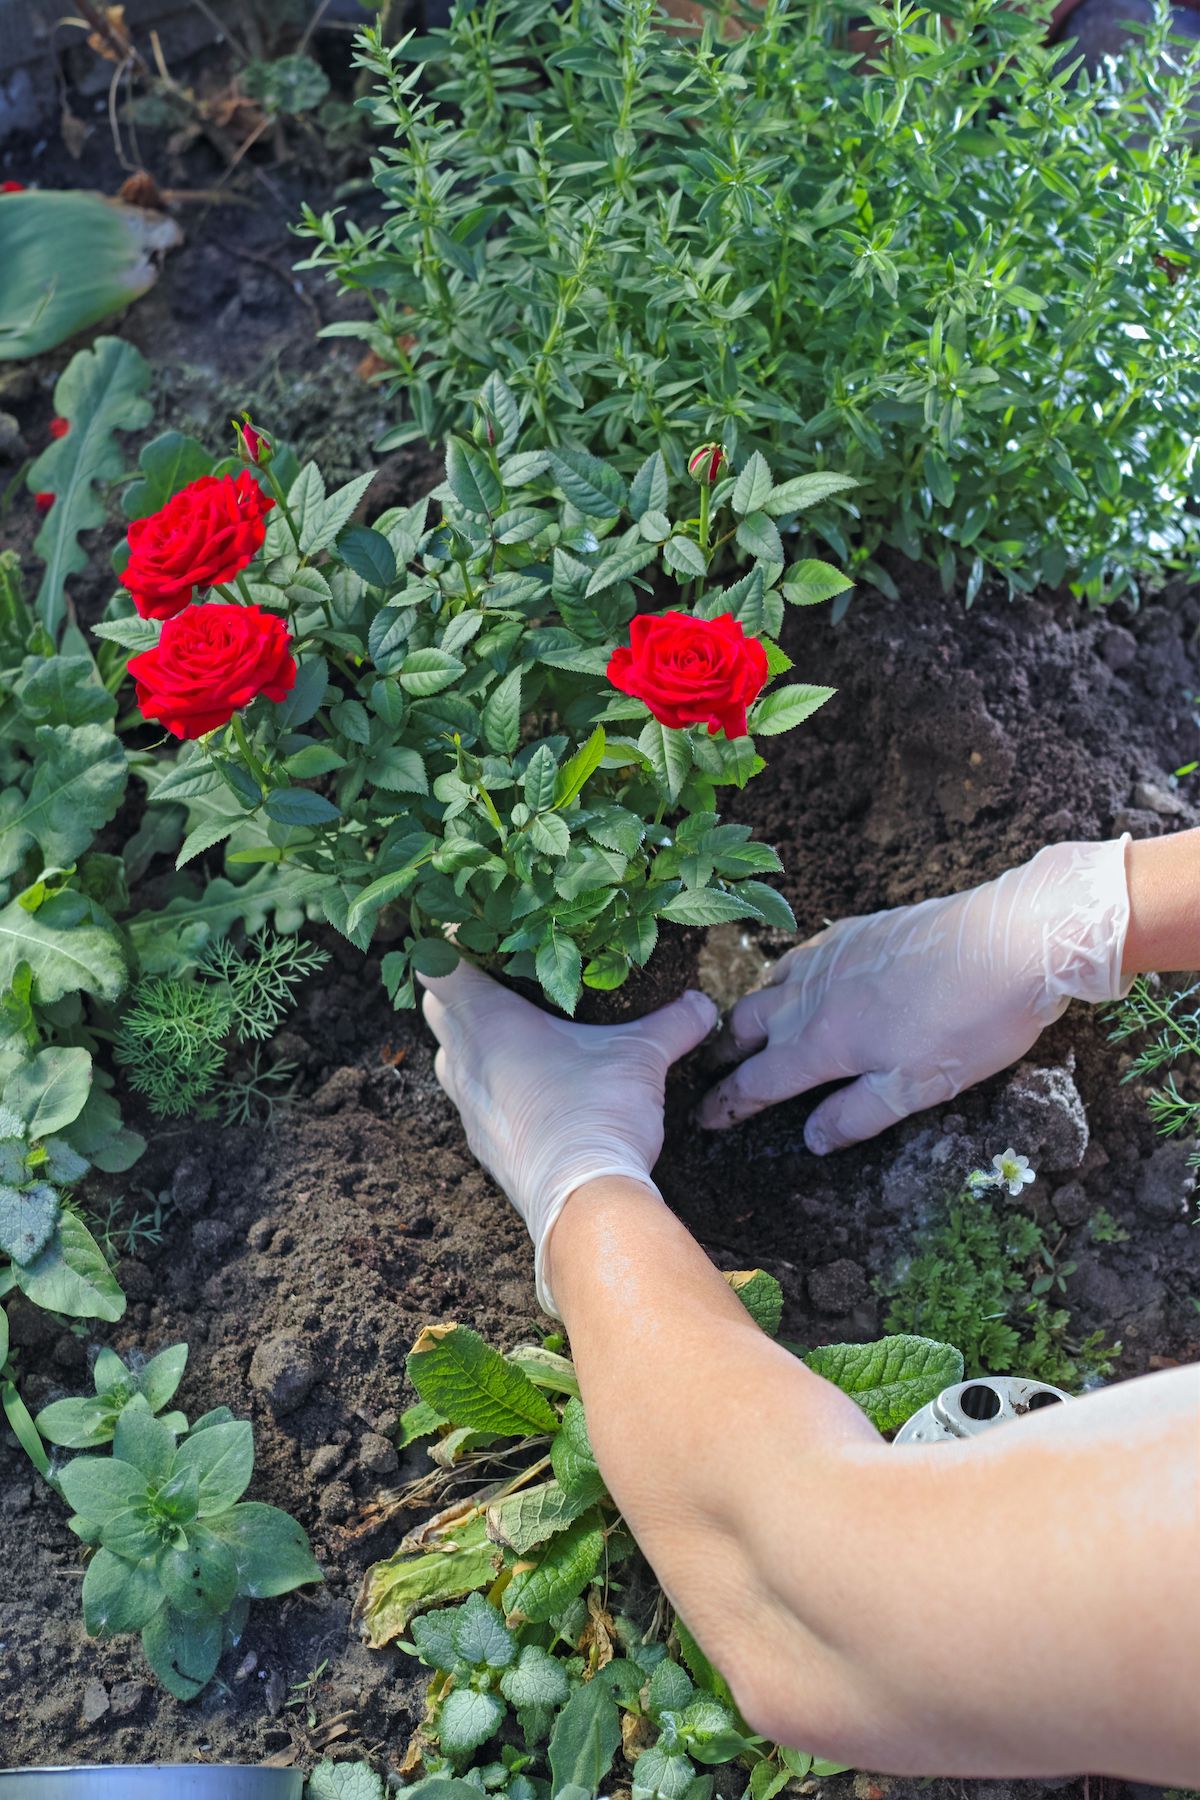
Spread the roots of your roses out, then place the root ball in the hole you created at the new planting location. Fill the gap halfway with soil, making sure the crown is at or slightly above ground level.
Gently press the soil through the root ball with your hands, then water thoroughly. After a few moments, shovel in enough soil to fill the hole and flood it with water once more. Finish by applying rose fertilizer and cover with organic mulch.

A Guide on Transplanting Roses (How To)
When is the best time to transplant a rose bush? Roses are best transplanted in the spring or fall. If your plant is in a terrible position, you should act quickly regardless of the season. If your shrub is growing in soil that isn’t right for it or isn’t getting enough sun, it should be transplanted as soon as possible.
You can transfer your dormant rose at any point during the winter in locations where the soil does not freeze solid. A move will cause less disruption to a dormant plant than one actively growing. Remember these three attributes when deciding when to transplant in terms of weather: cool, gloomy, and wet.
If you relocate your rose on a chilly, cloudy day, or the day after it rains, there will be less shock. On the other hand, you may relocate it in a drizzle. If you’ve had a downpour, let the earth dry up a little. You can determine the best time to transplant roses using the weather at the time you intend to transplant.
Cool, gloomy, and post-rain days are great since more moisture is available and less drying sunlight and heat.
Get your rose bush ready. A little planning will go a long way toward making a move more manageable. Reduce the size of a dormant plant by half or a live plant by a third. We do this because we’re inevitably diminishing the plant’s root structure. This means it won’t maintain the same quantity of foliage for a while.
Make sure you get rid of any flowers as well. You want it to concentrate on getting back on track, not on flowers. However, if your plant is less than two feet, you don’t need to cut it back.
If you don’t want to lower the overall size of a larger plant, you can leave it untrimmed. However, if you don’t prune, you’ll have to be especially careful to watch your transplant to see how it’s doing.
If it starts to wilt, it’s warning you that its newly decreased root system can’t support all of its foliage. Likely, you did not dig up all of the roots when you relocated them. To see if it helps, try giving it water more frequently. Trim it back by a third if it isn’t already. Give the plant a deep drink of water the day before you plan to move it if it isn’t dormant.
Wrap the plant in burlap or use burlap strips or rope to carefully knot the canes up and secure them together before transplantation. If your plant is small, you can skip this step, but you should enclose anything more than two feet. Don’t forget to put on your protective gloves.
If you’re transplanting climbing rose variety, you’ll need to reduce the height by roughly a third to make it manageable. You might also request assistance to transfer the plant by supporting its peak. Alternatively, you can lay the plant on its side on a sheet and drag it to the transplanting place.
Create a New Hole
Make a new hole before you start digging up the plant. In that manner, you will expose your rose’s root to the elements for as little time as possible. If you’ve never planted a rose bush before, the process is similar to that of any other woody shrub. Make a hole at least twice the width and depth of the present root ball.
Divide the entire height by four and the total breadth by two to get the shrub’s full stature. A plant that is four feet tall and three feet wide, for example, will most likely have a major root structure that is 12 inches (5 centimeters) deep and 18 inches (7 centimeters) wide.
Roses’ roots are shallow and grow outward rather than below. Therefore, you can presume that the primary root system of your plant is roughly this size unless it is much larger or lower than the dimensions described above.
Change the dimensions for ground cover roses. When estimating the size of the root ball, multiply the entire width by four and the height by two. Use the width as a reference for digging for climbing roses, and dig about two-thirds as deep as you dig broad.
Some individuals recommend utilizing the drip line. This is the point where water drips from a plant’s canopy and onto the soil. Again, this is a reference for root width to determine where to begin digging. You can do the same thing with flowers.
However, because rose roots prefer to develop beyond the drip line, you should dig a little further out than the drip line. Divide the diameter of the circle across the middle by two-thirds. That’s roughly how deep you should dig.
Make your hole twice the breadth of the roots’ calculated width and a few inches (a few centimeters) deeper than the depth you calculated.
On the other hand, a three-foot-wide hole would be a stretch unless you’re going for a serious workout or have access to an excavator. So don’t worry about being precise; just go as broad as you can. The majority of roses are rather versatile.
Mix some compost into the soil you’ve removed from the hole, and re-insert some of the mixed soil into the hole’s base so the plant may sit as high as it was before. Next, make a small cone of soil in the bottom of the hole to sit the roots on.
Remove the Plant
It’s time to dust off that shovel and reposition your plant. You should utilize a pointed or round digger to make the process easier. After that, begin digging straight down. You’re not aiming to get rid of dirt; instead, you’re seeking to isolate the root ball from the surrounding soil.
All you have to do for a small rose under a foot tall is press the shovel down as far as possible into the earth with your foot. You should do this around the perimeter. Then, enter the shovel, tilt the handle towards yourself, and pop the plant out of the hole you made.
Push the shovel down and jiggle it back and forth and side to side a little for larger roses. Then, move the shovel a bit more over and continue until you’ve gone all the way around the perimeter. If you come across huge roots or a lot of resistance, move the shovel a few inches out and start digging again.
If you have other plants with large roots growing nearby, you may need to clip the roots with a garden saw or trimmers rather than trying to find a root-free site. You should dig out anything greater than a pinkie finger in diameter and leave a few inches of room around the plant.
Many lateral roots will be left behind, which is fine. The goal is to extract the majority of the primary root structure. If you begin excavating and discover that the roots are considerably larger than expected, stop digging and construct a larger hole. Return and move your shovel out a few inches to widen the perimeter, allowing you to remove additional roots.
Dig down as far as you need to go until your shovel no longer hits massive, pinkie-width roots. You should continue digging in a circle around the rose. Remember that you’re making a break where the plant will split from the surrounding dirt, not digging the plant out. You shouldn’t remove much (if any) soil at this point.
Grab a garden fork and place it in one of the trenches you’ve created once you’ve dug all the way around. Leverage is used to move the root ball out of the hole by gently tilting the fork handle back toward your body. You may need to figure it out by wriggling the fork back and forth.
It’s even better if you have a companion who can do the same thing on the opposite side of the plant simultaneously. You can also do this using a shovel. Be careful not to sever any huge roots while working beneath the plant with the shovel.
You can come upon some roots that are resistant as you raise. Use clean pruners to clip away these roots at the lowest place you can reach, rather than dragging and ripping the plant out of the dirt.
Place Your Rose in the Garden. Are you ready to reposition that rose? Put your dug-up plant on a tarp and bring it over to its new place. Transport it in a wheelbarrow if you end up with a large ball of soil. Carry the plant to its new location if it’s a manageable size for you.
To free up the roots, gently loosen the soil at the base of the root ball. Then, scatter them out across the soil cone you produced. Instead of tying up or growing straight down, this encourages the roots to spread out.
If you could not dig a hole large enough to hold the roots, you can use secateurs to clip some of the outliers away until the whole thing fits. However, once it’s in the ground, you’ll need to prune the back part of the canes so that the roots can support the top. Then, finally, cut the rose down to two-thirds of its original size.
Then, fill in around the plant using a mixture of current soil and well-rotted compost. Soak the hole with water to help settle the soil after you’ve filled it about two-thirds of the way. Fill the hole to the top and water it once more. Remove any burlap or rope you used, and cut the plant back if necessary.
Keep a tight check on your plant and plan to water it more frequently than usual. Start with the same amount of water you’ve always used, but if you see any wilting, up the amount by half. If you relocated it during the summer, it might be necessary to sprinkle the foliage in the morning as well. Wait till new growth appears before fertilizing.
Give Your Rose a Good Home
Roses transplant from one position to another may appear to be a lot of labor, but you and your plant will be much happier once your rose is in a better spot.
Cut!
When do you transplant roses? Early spring is the optimum time to transplant roses. However, it’s best to transfer your rose plants when they’re still dormant. Before transplanting, make sure all frost or freezing weather hazards have passed. You can also transplant roses in the fall. Just make sure you get your rose’s roots wet.
Transplant your rose as soon as possible after removing it. To avoid shock, don’t leave the root out for too long. Keep in mind all the steps and precautions as you take the transplanting process. Have all the necessary tools to avoid stopping the process for a long time. The faster and accurately you apply the process, the better the outcome.